
This article outlines how to set up a new project in the Project Management tool, including how to name and link your recruitment project to an itracks account. This project creation lets you create a project in the itracks Qualitative Research Software right from the Project Management software tools where you can pre-qualify your participants before they are invited to the research.
Quick Links
Choose Product
Add Team Members
Login
Direct login to the Project Management portal can be found at https://management.itracks.com/. Use the same email address and password you use to log into go.itracks.com.
If you are already logged into your project on the qualitative research platform at go.itracks.com you can access the tool from the project. How to access the Project Management Tool
If you are in a specific project, click the Portal link in the upper left corner of the screen to go to the main portal.
New Project Button
In the upper right corner of the screen, click the New Project button.
Project Details
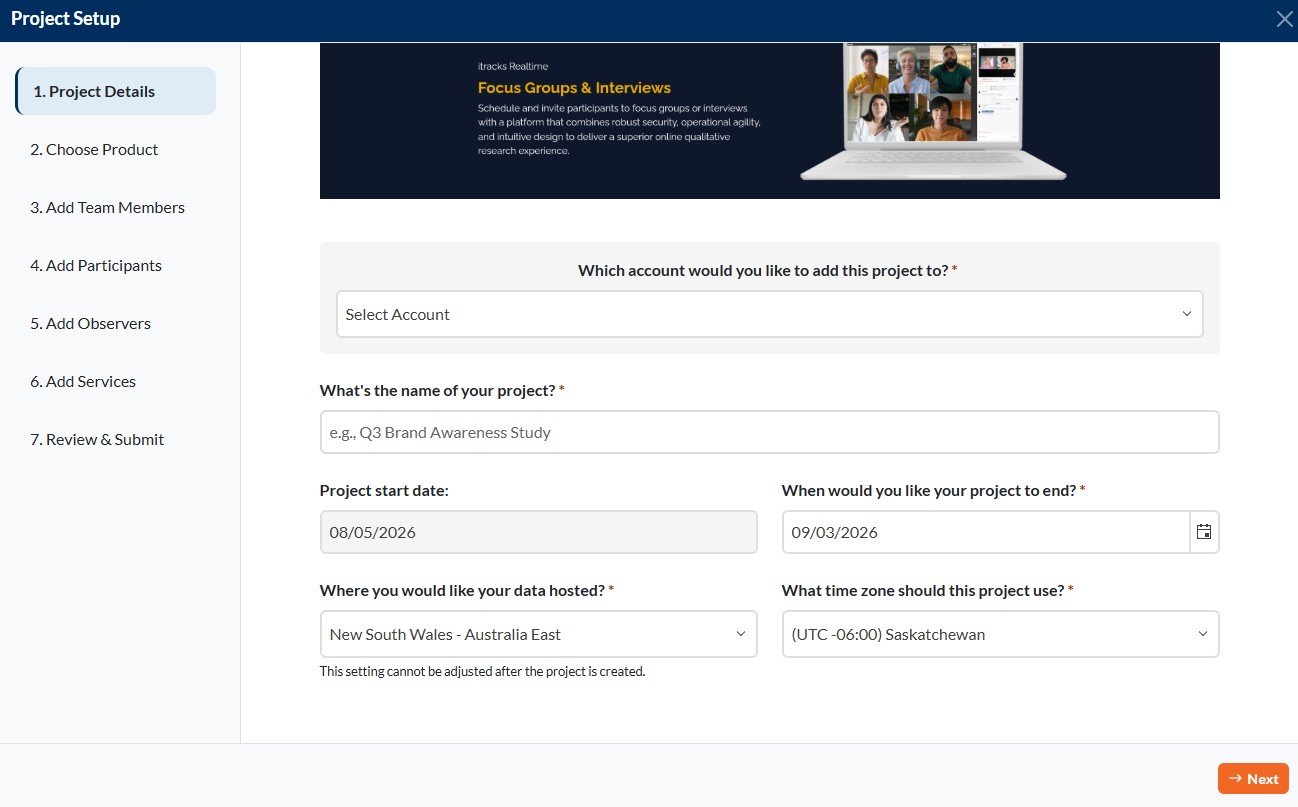
The following are required fields on this page:
Select Account: This drop-down only appears if you have access to multiple accounts. Use the drop-down to choose which account you are setting up the project in. If you only have access to one account, only one account will appear here.
What is the name of your project?: This is where you enter the name of your project. This name is not seen by participants. The participant's name can be added or adjusted in project settings.
Project start date: This will default to today and be the first time you can access the project.
When would you like your project to end?: Use the calendar button here to adjust the end date of your project.
Click the calendar icon to bring up the calendar selection. Choose a start and end date for your project. This will default to today's date. The start date will be the day you need to access the project to start the set up.
Where would you like your data hosted?: Use the drop-down to determine the storage location of your data. This setting cannot be adjusted after the project is created.
What time zone should this project use?: the time zone that the project should be booked in.
Click the Next button to proceed to the next step of the setup process.
Choose Product
This stage of the setup will let you choose the product you want to use for your research. If you are not a current subscription holder, you will be shown the subscription options available. If you currently have active subscriptions on your account, you will see when your subscriptions are active until.
To get more product details, click the Explore Features button.
Click the Choose button to choose the product and, as applicable, the subscription type needed for that product.
Once you have made your selection, click the Next button to proceed to the next step of the setup.
Add Team Members
This step is optional. If you prefer, you can still add your team members after projects are set up using the Users tab in both Board and Realtime projects.
If you do want to add your team members at this time:
Click the Add a team member button
Enter your team member's information
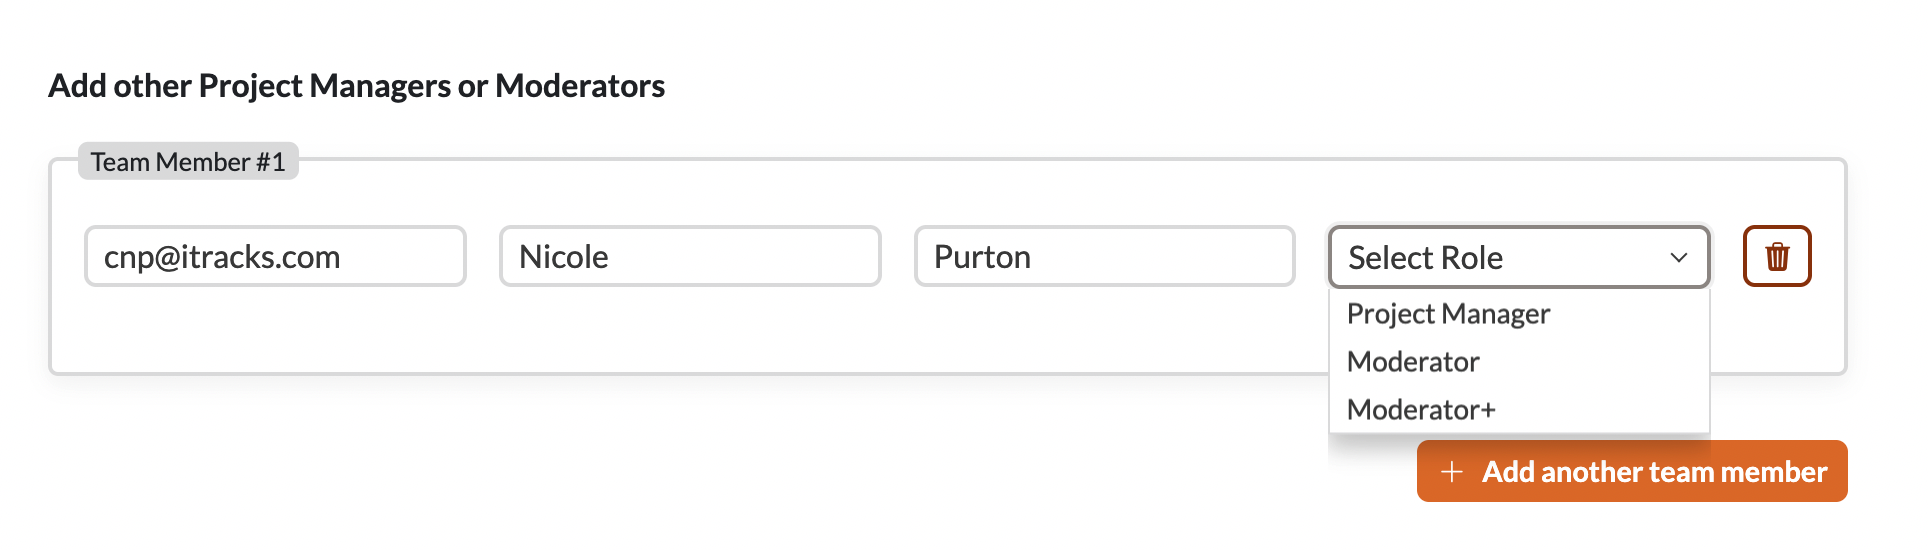
Email address - enter the email address of your colleague/team member
First Name and Last Name - type in your team member's first and last name
Select Role - Choose the role the team member will need to have in the study from the drop-down box. For a comparison of roles, please check here: User Roles
If you are adding a recruiter, you will have the opportunity to do so later in the setup process.
To add another team member, click the Add another team member button and enter their details
Use the delete button to delete a team member during the setup process.
If you are not adding additional team members, or if you are done adding team members, click the Next button to proceed to the next step of the setup.
Add Participants
On this page, you will share how people participating in the research will be added to the study.
Select the option that best suits your project:
-
My Own - you are loading and getting video validation from recruits on your own. You will add participants once the project is created.
-
Add Recruiter - lets you add a recruitment partner to load and manage users
-
Choosing this option lets you input Recruiter information so they are added to the project.
-
-
Request Quote - will provide a link send a quote to our recruit partners to assist with project recruitment
After making your selection, click the Next button to continue to the next screen of the set up process.
Add Observers
This step is optional. If you prefer, you can still add your observers after projects are set up using the Users tab in both Board and Realtime projects.
If you do want to add your team members at this time:
Click the Add an observer button
Enter your observers' information
Email address - enter the email address of your observer
First Name and Last Name - type in your team member's first and last name
To add another observer, click the Add another observer button and enter their details
Use the delete button to delete an observer during the setup process.
If you are not adding observers at this time, or if you are done adding observers, click the Next button to proceed to the next step of the setup.
Add Services
This page lets you add services such as concierge support (for Realtime projects only), product training, and support packages.
Concierge Services
This service upgrade is only available for Realtime product usage. Not available for the Board product.
Free live support via the itracks help desk - no additional costs. All support for your project is done via our help desk.
Welcome service for $75 USD per activity- includes 30 minutes of concierge support for your session. A member of the itracks concierge team will join your session, welcome and test your participants, making sure your session starts as expected. The concierge team member is not required to stay for the entire session and will drop off 15 minutes after the session starts.
Upgrade to concierge service for $150 USD per hour - the concierge team member will join your session, welcome and test your participants and stay the entire session. This is an hourly cost charged out at 30-minute increments based on the time spent in your session.
For an outline of concierge services and when we recommend you use them or not, please refer to this article - itracks Concierge Details
To upgrade the services for your project overall, click the option you want for this particular study.
Product Training
Clicking the unlock button here will let us know that you would like a product training for an additional $199.
This training will include 1 - 1 hour of training for you and your team.
Project Management Support Package
The project management support package includes up to 10 hours of services and includes for $1,499:
- User importing/setting
- Activity creation
- Email Invites and Reminders
- Guide and Media set up
- Project Management
Once your selections are made, click the Next button to proceed to the final step of the setup process.
Review and submit
Review your project details. You are able to go back and edit any of the sections using the Edit buttons on the screen or by navigating on the left hand side of the screen.
Click the Create Project button to save your project. Once created, you will be taken to your project.
Comments
0 comments
Please sign in to leave a comment.